by Steve Myer and Matt Bounds, Hobie Hotline Winter 2017 (Volume 46, Number 1), pp 12-14
Sails are critical to the performance of every Hobie Cat. Their colorful patterns do more than just give our boats a unique and attractive appearance. They are the engines that convert wind energy into high-speed performance. In spite of their importance, they are frequently overlooked when it comes to maintenance. This is because, for the most part, sails require very little maintenance. They are built from corrosion-resistant materials, have no moving parts, and are designed to provide many years of trouble free service.
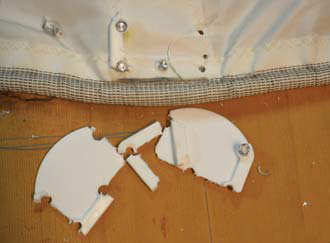
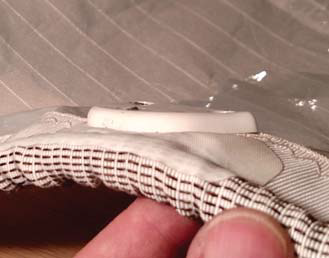
However, a critical component of all sails with battens that should be inspected are the batten pocket protectors. These are the small plastic caps that are affixed to the forward end of each batten pocket. They help to transfer the batten load to the mast and prevent the tip of the batten from poking through the luff of the mainsail. Over time, the plastic pocket protector can break down and crack. This is also a high-wear area on the sail, especially the boltrope. If not replaced or repaired, the pocket protector may fail resulting in sail or batten damage. The picture below left shows a pocket protector with several cracks and is on the verge of failing.

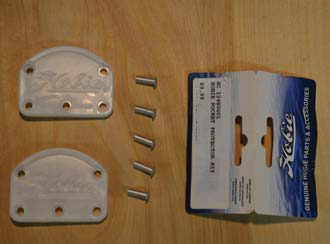
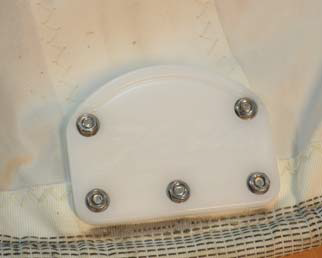
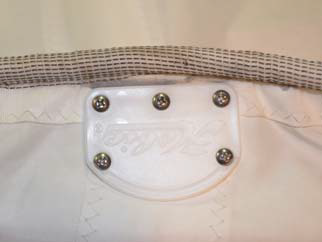
Each pocket protector is comprised of two molded plastic halves that are riveted to the sail with aluminum tubular rivets. Originally Hobie sails used a four rivet pocket protector similar to the one at right, but sometime around year 2000, the design was changed to a five-rivet configuration like the one to the left. Hobie 16 jibs and the upper battens on a Hobie 17 main use a triangular, three rivet design. Replacement kits are available for all types (the one to the right is a replacement cap kit with brass machine screws / nuts), but make sure you order the correct kit for your sail since they are not interchangeable. This article explains the process for replacing the both the five-rivet and three rivet pocket protectors, but the process for replacing a four-rivet protector would be similar.
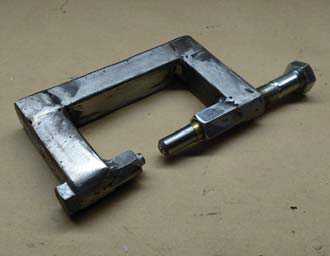
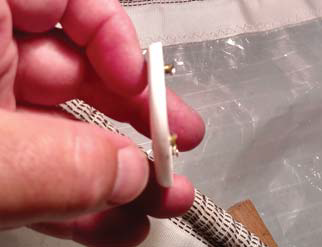
The Hobie main pocket protector kit (P/N: 12480001) [1] includes the protector’s two plastic halves and five solid rivets [2]. The solid rivets provide a clean, low profile method for installing the pocket protector onto the sail. However, this type of rivet is ideally set with a large, heavy bench tool. You can buy a hand-setting die and anvil (Hanson Rivet Co. P/Ns HT-171 and SQ-4-21) for about $50, but setting the rivet well is difficult – the tools are hard to control with just your hands.
One of us (Matt) made a C-clamp type tool to hold the die/anvil steady while the rivet is set [2], but despite its robust appearance, it flexes in use. It works, but not particularly well. Still, it’s better than holding the tools by hand.
So if you need to replace a broken pocket protector, it’s likely that you’ll either need to have the new one installed by a professional sail maker or use an alternative fastener to the solid rivets.
Stainless steel machine screws with hex nuts and washers are a good substitute for the rivets and they can be installed using a few basic hand tools. Here is what you’ll need:
- Pan Head Machine Screws, 8-32, 0.5” Long (McMaster P/N: 91400A194)
- No. 8 Flat Washer (McMaster P/N: 90945A725)
- Narrow Hex Nut, 8-32 (McMaster P/N: 90205A309)
These particular fasteners were chosen because their size allows them to fit very nicely inside the counterbores of the pocket protector mounting holes. This minimizes the protrusion of the screws and nuts above the surface of the pocket protector providing a clean installation [3].
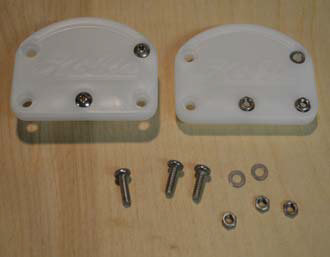
(Note that the four-rivet pocket protector kits – like the one on the opposite page – are supplied with screws and nuts, so the kits are ready to go right out of the package.)
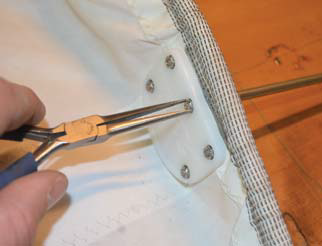
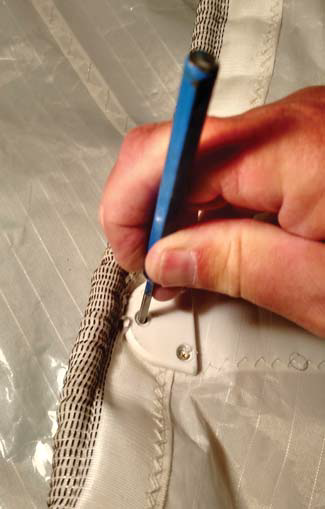
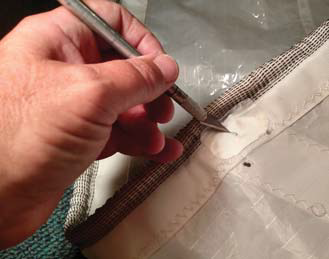
To replace the batten pocket protector, you first need to remove the old, damaged protector. Start by releasing the tension on the batten and pulling it out of the pocket at least six inches. You will want to place a flat piece of wood under the pocket protector to provide a solid work surface. Then drill out the rivets that are holding the pocket protector onto the sail [4].
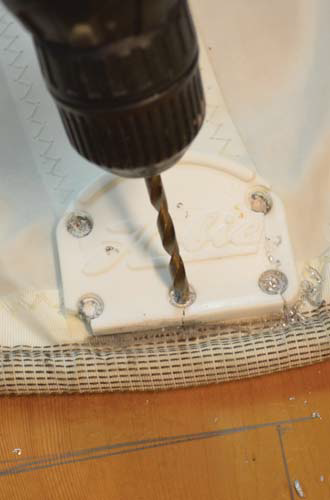
The pocket protector may start to break as you drill out the rivets, so go slowly being careful not to slip and damage the sail cloth [5].
Once you have one side of the protector removed, pull the remaining portion of each rivet through the sail. If the rivet is adhered to the sail cloth, you may need pliers to twist it free. The drilled edge of the rivet is sharp and could damage the sail, so be careful [6].
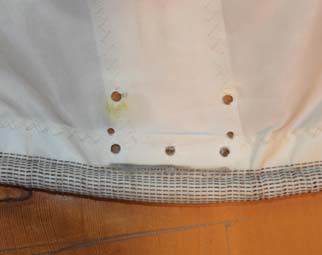
After the old protector has been removed from the sail, there will be seven holes in the sail. The two small holes are used to align the protector halves, and the five large holes are for the fasteners [7].
Check the fit of the new pocket protector by installing each half onto the sail. The alignment pins on each protector should be engaged and the holes in the protector should align with the holes in the sail.
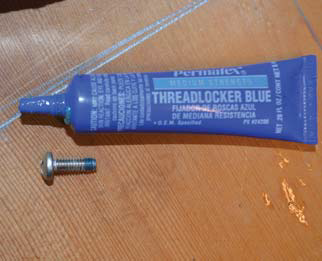
Place a small amount of medium strength thread locker (Loctite) on the leading threads of each machine screw [8]. Be careful – it will stain the fabric.
Install the screws into the luff protector and then install a flat washer and nut. Tighten the screws firmly. It may be helpful to use a pair of small needle nose pliers to hold the nut [9].
With the new pocket protector installed [10], [11], ensure that both sides are smooth and free of sharp edges. Any sharp edges may be removed using a small flat file. Reinstall the batten and you’re ready to hit the water.
The smaller protector caps on the Hobie 16 jib and Hobie 17 upper main battens are attached with three brass rivets smaller than the aluminum rivets used on the larger protectors [12]. In this instance, the cap had to be removed to make a minor bolt rope repair.
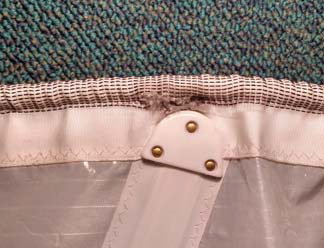
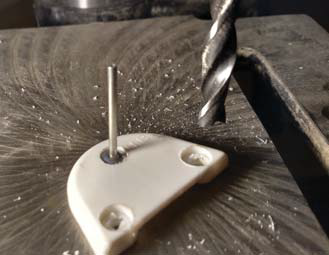
Again, start by carefully drilling out the set end of the rivet – notice the wood block under the cap [13]. Since the cap is to be reused, be extra careful not to drill too deep. Once you’ve got the flared end of the rivet off , drive the rivet out with a punch [14]. A wooden block supports the underside of the cap while the rivet is driven out.

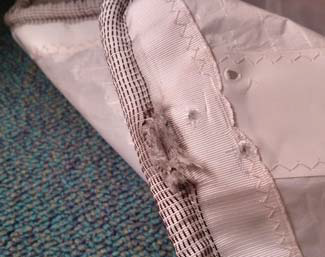
Once the cap is removed, the full extent of the sail damage can be assessed [15]. This 17 sail was hanging up on the comptip/aluminum interface on the mast and the bolt rope eventually frayed open. This was right on the borderline of requiring a professional sail maker repair.
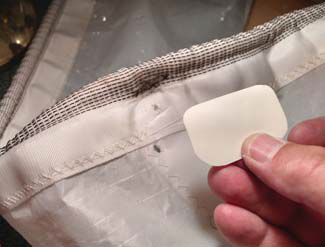
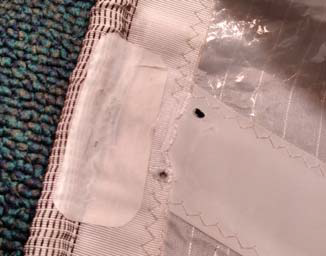
After cleaning up the frayed ends and kind of welding everything back together with a hot knife, two sail repair tape patches were cut, with the corners rounded to help prevent the patch from peeling up [16]. The repair area was wiped clean with alcohol and allowed to dry thoroughly. The patches were then stuck down on both sides of the sail [17].
Instead of nuts and bolts to reinstall the protector, or replacing the brass rivets (with the same problems with tooling as for the larger luff protectors), you can use 3/32″ aluminum pop rivets for the small protectors for a semi-permanent repair.
The head on the pop-rivet is larger than the brass rivet head, so the counterbore on the batten cap needed to be carefully enlarged. This is done using a brad-point bit that drills a flatbottomed hole so the rivet can sit flush [18].
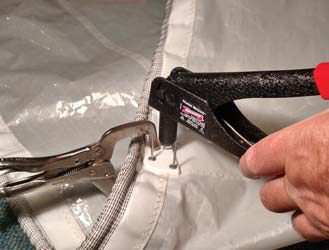
Before reassembling everything, the rivet holes were cut out in the sail cloth patches with an X-Acto knife [19]. The protector halves and rivets were all assembled in their proper places and held together with Vise-Grips while the rivets were pulled [20]. Placing all three rivets at once ensures everything lines up.
After pulling the rivets, check to see if there are any sharp edges or protruding bits from the rivets. On this repair, one of the rivets didn’t quite pull down below the edge of the protector [21]. The cure for this, since the rivets are fairly soft, is to peen down the off ending rivets with a ball peen hammer (notice the wood block support) [22].

Eventually, this sail will need a professionally repair. It held up fine for the five days of the 17 North Americans — and you can’t beat the cost when you already have the sail tape and rivets in your parts box.
![]()